
Step-by-Step Tutorial to Transform Wood Tiles into a DIY Faux Tile Kitchen Backsplash on a Budget. Create Your Own DIY Kitchen Backsplash!
It’s crazy how you can complete a renovation on the scale that we did, and still be intimidated by some projects. We jumped right in when it came to tearing down walls, ripping up floors, relocating doorways and more. But the kitchen backsplash was left undone for months! Seriously, it was one of the last major projects we completed, because neither one of us wanted to deal with cutting tile.
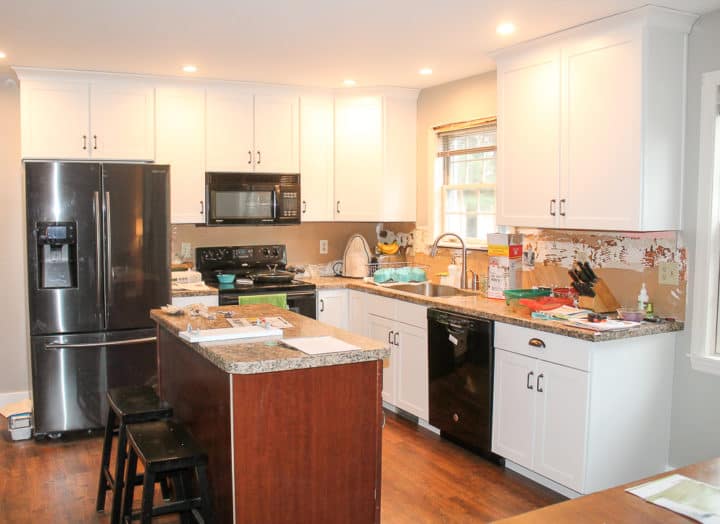
Last week, I finally showed you the before and afters of our kitchen remodel. Even though I lived through it, and did a ton of the work myself, it’s still hard for me to believe that we started with this:

and now have this:

It’s SO much more my style, and I love coming downstairs each morning to a bright, cheerful kitchen! The reality, though, is that we were so intimidated by tiling the backsplash, that we lived with this for about 4 months after the rest of the kitchen was finished.
Yep, friends would come over and ooh and ahh over all of the changes we made, but then were faced with this ugly mess in the kitchen! Until one day, when I had an idea.
It started with me being cheap and not letting anything get thrown away.
When we were still in demo mode, we ripped up this floor in the hallway that led to the front door.

My 12 year old daughter actually ripped it all out herself and after she got a couple boards out, she called for me. Because underneath it was another floor. And not just any old floor, but the original 30 year-old, parquet wood floors!

Now I want to pause right here, because I’m getting tons of really nasty, hateful comments about not just ripping this floor out but that I had the gall to paint it. Imagine the horror of doing what I want to something that I own?? Crazy world we live in.
Here’s the thing, though. So many of you are looking at the above picture and saying “It’s in perfect condition!” “It’s beautiful! I NEVER would have removed it!” and on and on and on. The reality is, you’re seeing a tiny picture and that’s it. You have NO idea what it really looked like or what our plans were for this room.
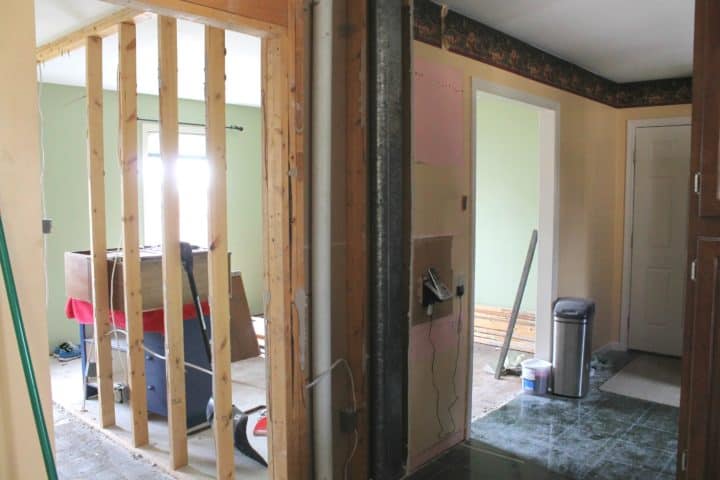
The open studs you see on the right of the picture is a wall that was removed completely. That little space between the open studs and the wall on the left is where this hallway was. This hallway was opened up to and combined with the adjoining room. You really would have kept a tiny strip of this parquet floor against one wall and had the entire rest of the room be a different flooring?? That’s bizarre.
On top of that, the previous owners must have realized there was a water leak issue near the front door, so they had already ripped out a large, jagged area of this parquet floor and put down a cheap subfloor. That was why they had put the laminate flooring over it. What they didn’t do, was actually correct the water issue. It all needed to be ripped out in order to deal with that correctly. And yet I’ve been told I desecrated this floor, I have horrible taste, I ruined it and so much more. Are you guys for real?? You would have left this water leak and a small patch of a floor with a jagged perimeter?? That’s crazytown.

The reality is, I was there, I knew all the extenuating circumstances and I was the one in the dumpster with a flashlight trying to salvage all these pieces so that they didn’t end up in a dump somewhere! I hardly think that qualifies me as a horrible person.
Aaaanyways… it came out so easily and in pretty much all solid pieces, and we still had a kitchen backsplash issue that we were trying to solve! Does anybody see where I’m going with this??
Yep. We might be intimidated by cutting tile, but we can cut wood all day long! So I asked my husband what he thought of using these wood tiles as a backsplash, and he was pretty much on-board immediately! Not always the case my friends!
We measured, we cut and we used some Liquid Nails to adhere it right to the drywall. If we ever take this down, we’ll pretty much have to replace all the drywall. But, in our case, we really had nothing to lose. The drywall was in such rough shape anyways, so went for it!

Then I had to come up with a way to seal it. I emailed my contact at DecoArt who touched base with their Design Department to see which paint and sealer would give us the best results for such a high-traffic, messy area like a kitchen backsplash.
Based on their recommendations, I used a fine grit sandpaper to lightly sand all of the tile. Then I applied Americana Decor Chalky Finish in Everlasting. I painted 2 coats of this paint. I seriously fell in love with this paint. It was so thick and filled in so many cracks and grooves. There were no drips and it just left such a smooth finish!
After that dried, I applied DuraClear High Gloss Varnish. I did 4 coats of this just to be safe. It’s a great non-yellowing sealant that leaves you with a tough, clear finish.

I wanted to be able to splatter spaghetti sauce all over this and wipe it off with no issues. And I can!! I haven’t shared this project with you for so long, because I wanted to really put this to the test before I went and recommended this as an alternative backsplash.
We have now had it installed for about 7 months, and have had NO issues! I wipe it off pretty much every day and the kids splash water on it every time they do dishes. It has held up perfectly and hardly anyone believes us that it isn’t actually tile! It’s hard to capture in the picture just how shiny it is!
The other thing we did to finish it off is purchase a cheap wood trim from the hardware store. Before we attached this, I sealed every single side of it with 3 coats of the varnish so that there was no chance water could seep in.

We love the way it looks and brightens up the whole kitchen! Plus, I REALLY love that it was pretty much free and keeps some of the original history of this house.
DecoArt provided me with paint and varnish for this project, but even if I had to purchase it, it would only have cost me about $30 in supplies! Not bad for a kitchen backsplash!

We still aren’t completely done with our kitchen, but we’re getting closer. We plan on getting a butcher block top for the island, and once that is installed, I will trim it out and add more details to it to make it look custom. Hopefully soon!


Alison K
Wednesday 20th of September 2017
I am so stoked to have found this post about your backsplash. Thank you! I am going to give it a shot. My backsplash has been left undone since I remodeled the kitchen in my 1886 Victorian house in 2004. I think that qualifies me as a turtle...wish me luck!
Natalie
Friday 6th of October 2017
Ha! We can be turtles together! I hope it works well for you. We have had our backsplash up for over a year now with absolutely no issues. I wipe it down if sauce splatters on it, it gets wet from washing dishes... and it still looks exactly like it did when we installed it! I thought maybe I'd have to reapply the protective, gloss finish again, but I haven't had to at all! Good luck with your project!